The Workspace
Introduction
The Workspace is where you will spend all your time in Photoshop, so it makes sense to set it up to work as efficiently as possible. The default “Essentials” workspace that you start with may suit more experienced users, but it isn’t the most efficient workspace for a beginner. I've seen this in many classrooms.
There are 4 main panels that I recommend beginners use, as you will use them all the time (and these are not all visible with the Essentials workspace. They are;
- Toolbar
- Navigator
- Layers Panel
- History Panel
We will create a better workspace, then save it, so you can easily switch between the new workspace and if you wish, the Essentials workspace (and other workspaces). However, once set up, I'm confident you'll be happy to use the new workspace most, if not all the time.
The Toolbar
The Toolbar contains all the tools you will be using for your editing. It's default position is on the left side of the screen and I recommend that you leave it there (although you can move it by clicking an empty area at its top, then dragging).
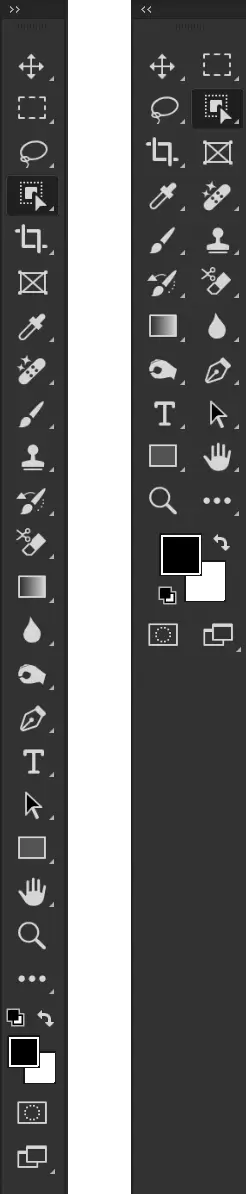
One or Two Column Toolbar
You can choose to have either a one column, or two column toolbar. To switch between them, click the small double chevron in the top left corner of the Toolbar.
Many tool buttons contain several tools. These are indicated by a small triangle in the bottom right of each button. When you click a button you will see a flyout of all the tools on that button. Note that the tool that is displayed is the last used tool, so you may not immediately see what you're looking for.
There is much more information about each tool here Toolbar Guide.
The Workspace
The workspace
Essentials vs Recommended Workspace
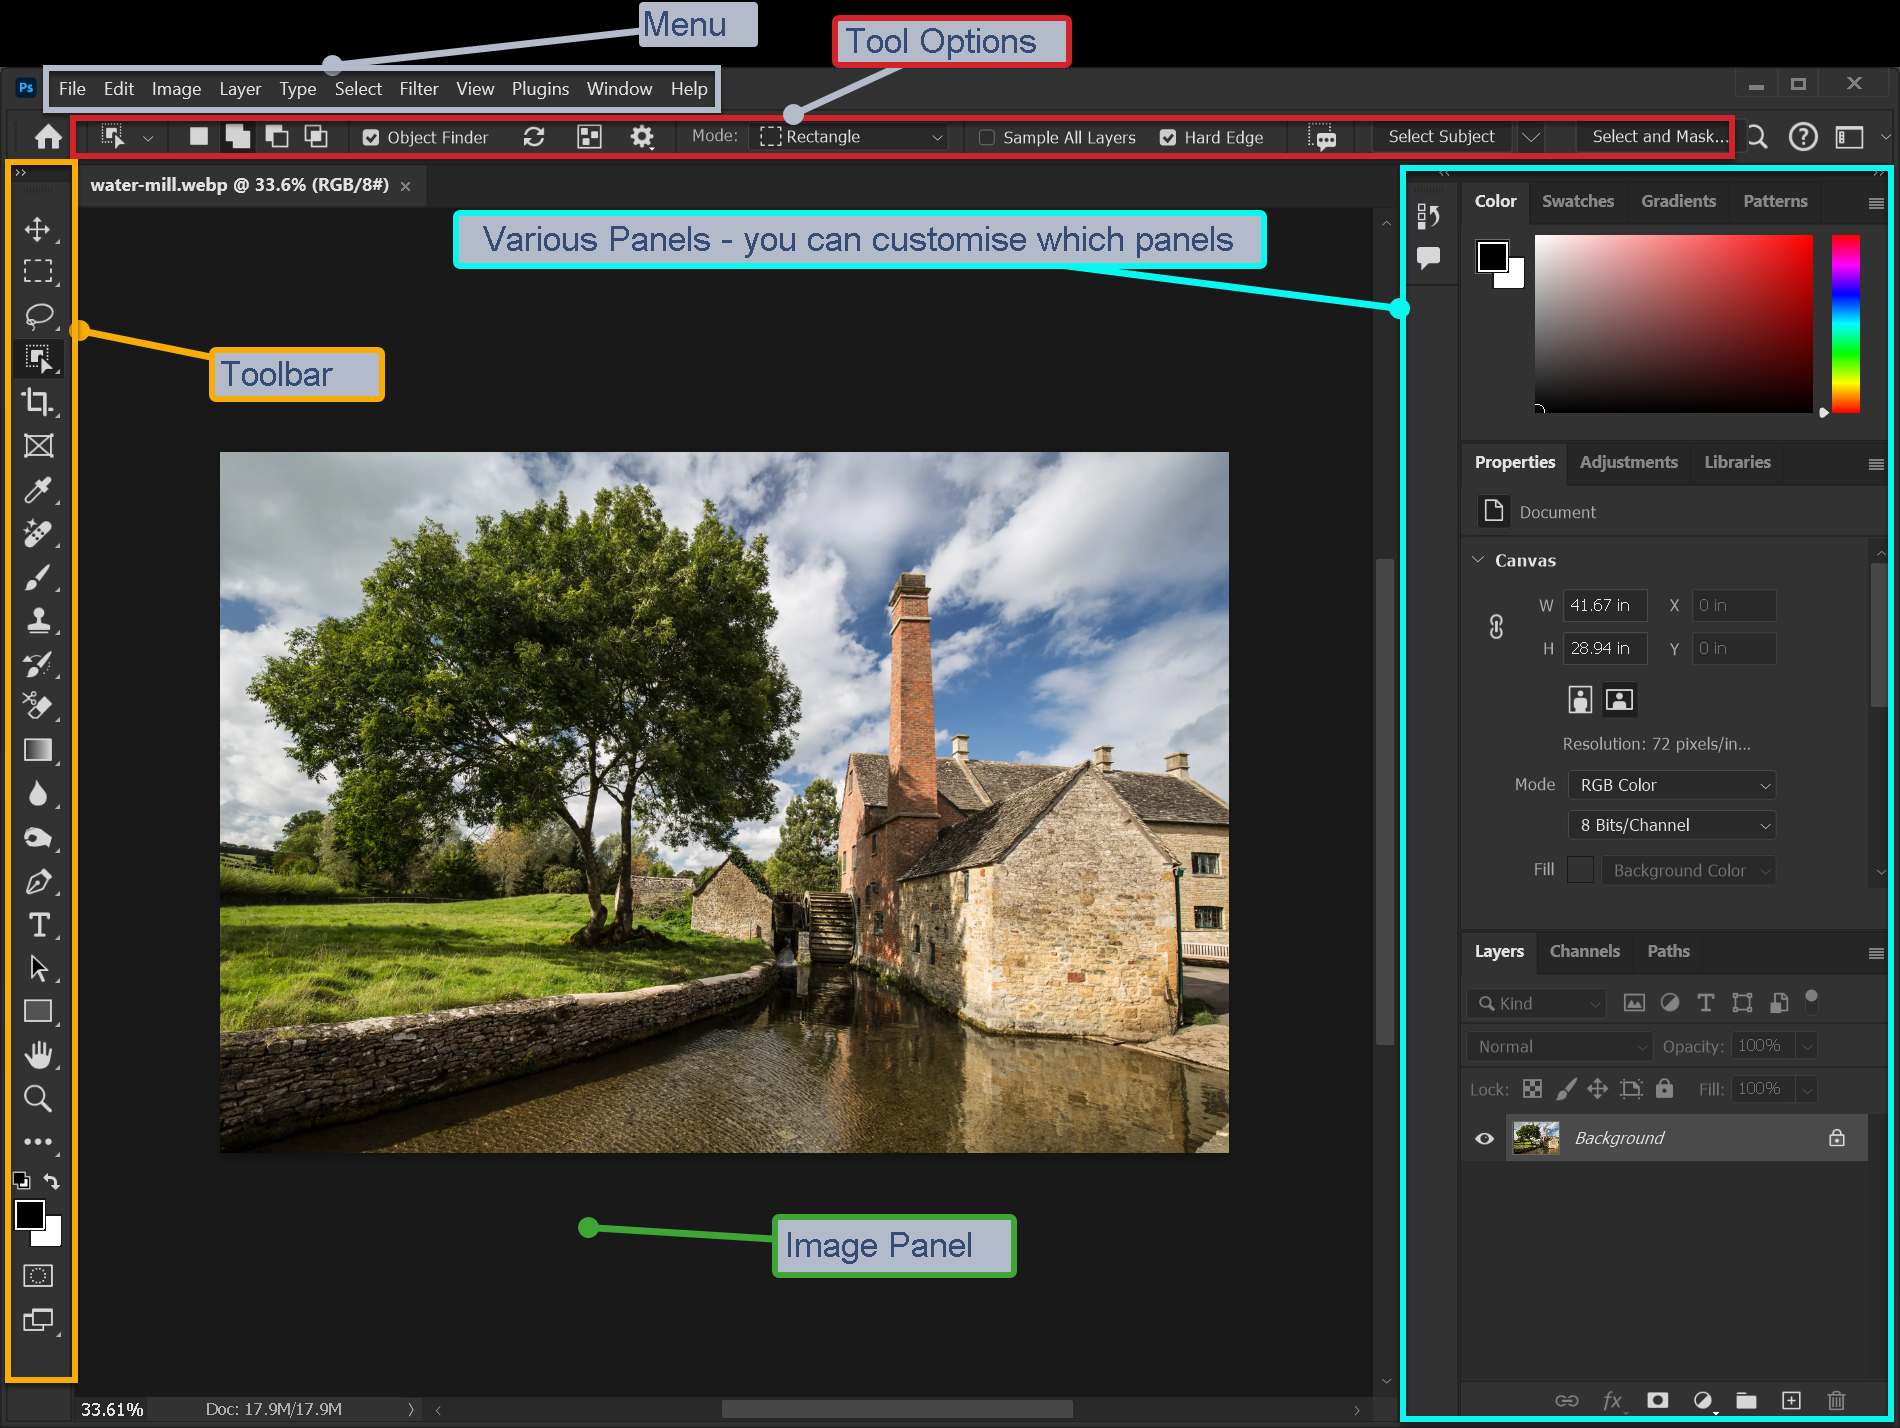
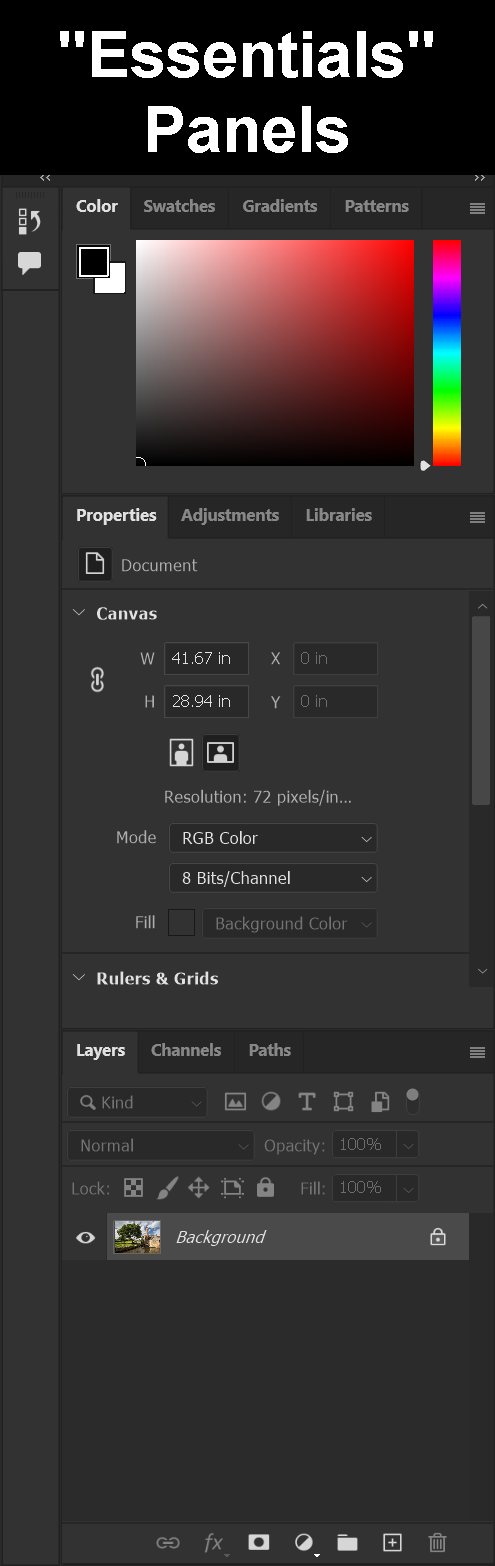
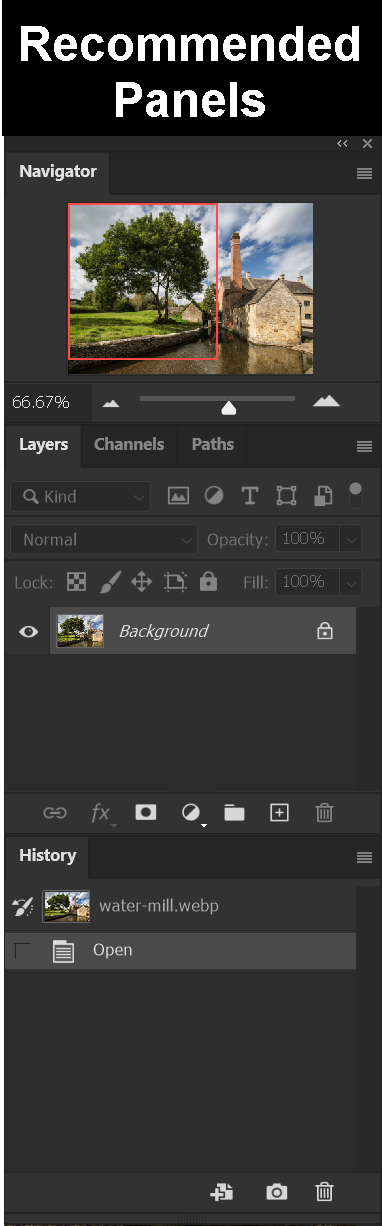
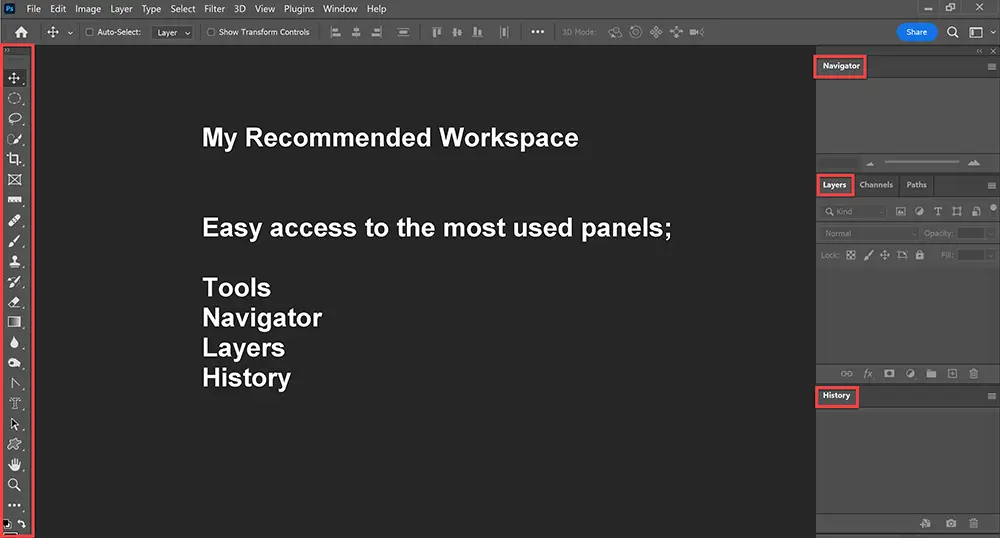
Below, the first screenshot shows the default “Essentials” workspace. This is not particularly beginner friendly, as I've seen teaching hundreds of beginners in the classroom. As you become more familiar with Photoshop, you will develop your own preferences, but for beginners I recommend the workspace shown in the second screenshot.
This includes the main panels that you use most often; Tools, Navigator, Layers, History. The “Essentials” workspace is missing some of these and has several other panels open that are hardly used, certainly by a beginner.
Customise the Workspace
The only panels that are used frequently that are open in the Essentials workspace, are highlighted in red; the Tools panel (left) and the Layers panel (right). Several other panels are also open; Color, Swatches, Gradients, Patterns, Properties, Adjustments, Libraries, Channels and Paths. However these panels won’t be used most of the time by most users and certainly not by someone new to Photoshop.
I recommend having the above 4 panels (bottom screenshot, previous page), open permanently, as you will use them all the time; Tools, Navigator, Layers and History. When you are learning Photoshop, you don’t need other panels open (you can open any panel from the Windows menu).
I recommend positioning them as shown above; the toolbar at the left edge of the screen and the other 3 panels at the right edge the screen. If you have two screens, I suggest positioning them on the second screen.
Close all other panels. You can always open a panel if you need it by clicking on it from the Window menu. Some panels open automatically when you select certain options.
Firstly, we’ll arrange the panels, then we’ll save a New Workspace, so you can quickly and easily switch between different workspaces, such as switching between your workspace and the “Essentials” workspace, if you wish.
1 Click on the double chevron of the thin vertical panel, to expand it.

This will show the History and Comments tabs. Click on the menu button and select Close Tab Group.
Click on the menu button for the group: Colour, Swatches, Gradients, Patterns.
Customise the Workspace
6 Click on the Properties tab and drag it away from the panel.

7 Select the three panels; Navigator, Layers and History. If they are not visible, select them by clicking on the Window menu and the panel name. When the panels are visible, they may be part of a panel group, so look for their tabs within a panel group. In the above screenshots, Properties, Adjustments and Libraries are all grouped together. The screenshot below shows the History and Navigator panels on the Windows menu.
8  Click on each panel tab for Navigator, Layers and History and drag each one into the middle part of the screen. If a panel is not visible, select it from the Window menu. If it is still not visible, it will be hidden behind an open panel, on the right of the screen. Drag your selected panels into the middle of the screen, so you can completely clear the panel area on the right of the screen.
9  Close the Tab Group. Click on the menu button in the top right corner of a panel (highlighted in red below in the first screenshot) and then click on Close Tab Group at the bottom of the menu. Repeat this process and close all Tab Groups.
1 0 When all Tab Groups are closed, reposition your three panels, Navigator, Layers and History. Click and drag on the top of the panel to move it as desired
Note: Make sure the Layers panel is taller, so that when you are working with several layers, you can see them all. You can resize and reposition panels at any time. To resize, move the cursor over the bottom or side, watch for the two-way arrow, indicating resize, then click and drag to resize.

Navigator
12  Even after closing unnecessary panels and arranging the remaining panels, as described above, if you work on a laptop or medium size monitor, things can still sometimes look a little cluttered.
13 You can hide all the panels by pressing the Tab key on the keyboard (just above the Caps Lock key). Press Tab once to hide the panels. Press Tab again to show the panels. If you spend a lot of time editing images and are able to use two screens, put all the windows on the second screen, leaving just your image on your largest screen.
Save the Workspace
After all that work to rearrange your workspace, you should save it as a new workspace. This will allow you to switch between workspaces at will.

Switch between Workspaces
 1 From the menu select Window > Workspace and select the workspace from the list. The screenshot above in step 1 lists Essentials, 3D, Graphic and Web, Motion, Painting, Photograhy workspaces.
Four Main Panels
You will use these panels a lot and they all have their own chapter, or chapters. Here is a brief overview of them.
Toolbar
The toolbar is the home for Photoshop’s tools. It is from here that you select the tool you require. To select a tool, simply click once on the tool button. Nothing will happen, except that you will have selected the tool, ready to use.
Many buttons contain several tools, which is indicated by a tiny icon at the bottom right corner of the button. To access other tools sharing a button, click and hold for a short while, then other buttons will appear as a fly-out menu. Click on the required button to select it.
You will need this panel open all the time. By default it is positioned on the left side of the screen and I suggest this is a good place to leave it. In the following chapters I will introduce the most used and most useful of these tools, although most of the time you will only use a small fraction of these. Some tools you will use a lot and some tools you will rarely use.
For more information, see the chapter on the Toolbar.
For an in-depth look at the tools panel and what each tool does, see Quick Guide to All Toolbar Tools.
Navigator
The Navigator window doesn’t make any changes to your image, but is very useful for navigating around your History
image. When editing small details in an image, it is often necessary to zoom in, (sometimes a lot) and zoom out. When you are zoomed in, you can’t see the whole image. The Navigator panel allows you to see which portion of the image you are viewing, shown as a red box. Notice as you zoom in that this red box gets smaller.
Zoom in by clicking the icon at the right end of the slider. Zoom out by clicking on the icon at the left end of the slider.
Or you can click and drag the slider left or right.
When zoomed in, to pan around the image, move the cursor over the red box and it will change into a Hand icon. Then click and drag the red box around your image to move to different parts of the image.
The hand icon in Photoshop indicates moving around your document. There is also a separate hand tool to do the same thing (more later).
Layers
It’s impossible to overstate the importance of layers in Photoshop and image editing (there are several chapters on layers later on). Layers are a vital tool and a basic building block of image editing. You will use Layers all the time and we will take a closer look at different features, uses and options in future chapters. As such, the layers panel is such an important panel.
During my teaching of many Photoshop courses I have observed beginners struggling with layers purely because they have their workspace poorly arranged.
It is vital for beginners (and most experienced Photoshop users) to be able to see all layers at a glance, without having to scroll within the layers panel.
In cases where students were not able to see all their layers without scrolling, things got confusing and errors were made. This then caused learning to be harder.
Tip: Adjust your Layers panel so you can see all layers.
For more information, see the chapters on Layers Essentials and Layer Masks.
History
The History window works very much like an undo tool, but is more useful and more powerful. It shows all the steps and names the tool used for each step that you have taken in your image and allows you to undo the last step, or many steps and go backwards and forward many steps. This is useful for comparing what you’ve done to how the image was many stages before. If things go wrong, step backwards through the History states to find the last one where things are ok.
For more information, see the chapter on Undo & History.
