Page updated: 14 June 2026
Masking Foundations in Lightroom Classic
Understanding the Core Tools Behind Selective Editing
Masking is where Lightroom Classic really starts to feel powerful. Instead of adjusting the entire photo at once, masking lets you target specific areas, such as brightening a subject, darkening a sky, softening a background, or adding colour and contrast exactly where you want it. It’s the difference between a quick global edit and a polished, image that looks fabulous and like it was crafted with purpose.
For beginners, the idea of “selective editing” can sound complicated, but Lightroom’s masking tools are designed to be approachable. Some masks are created automatically using Lightroom’s AI, such as Select Subject or Select Sky, while others give you full manual control through brushes, gradients, and range-based selections. Every mask is non-destructive, meaning you can refine, adjust, or remove it at any time without affecting your original photo.
This foundations guide introduces the core concepts behind masking: how selections work, how Lightroom decides what to include or exclude, and how different tools can be combined for more precise control. Once you understand these basics, the rest of the masking system becomes far easier to learn. Whether you’re editing portraits, landscapes, or everyday snapshots, mastering masking is the key to making your photos stand out.
Prefer to jump straight into hands‑on masking tutorials?
You can download the photos and follow along step‑by‑step and discover how Select Object outperforms Select Subject with the same photo:
Select Subject
Select Object
A 3 part tutorial series to create a mask, refine it and duplicate and invert it. Each tutorial has downloadable files, so you can work along.
Tutorial 1: Add Color Range
Tutorial 2: Subtract Using Select Objects
Tutorial 3: Duplicate & Invert Mask
ON THIS PAGE
Example of using Lightroom Masks in Editing
 Original photo
 Editing applied to Mask
This is a photo of my father on a holiday I enjoyed with him. It is a typical example of a photo that benefits by editing some parts differently to other parts. This can be done easily using Lightroom Masks.
In the original photo, the subject is too dark, but the background is exposed correctly. Lightening the whole image would fix the subject, but the background would then be far too light.
The photo is typical of many scenes where one part benefits by being edited differently to other parts. Note that the background remains the same in both photos.
This photo was taken specifically to illustrate this point. There are things you could do when taking the photo, to brighten the subject, such as use fill-in flash, or a reflector. If you adjusted exposure for the subject, the background would be over exposed and lacking detail.
1. What Masking Is and Why It Matters
Masking is Lightroom Classic’s way of letting you edit specific parts of a photo without affecting the whole image. As the above example shows, this can be very beneficial. Instead of applying global adjustments, masking gives you precise, targeted control; brightening a subject, darkening a sky, softening a background, or enhancing colour exactly where you want it.
- Selections: Masks define where your edits apply, whether chosen automatically by Lightroom’s AI or created manually by yourself.
- Non‑destructive editing: Every mask can be refined, adjusted, inverted, turned on or off or deleted at any time without affecting your original photo.
- Creative control: Masking lets you guide the viewer’s eye, balance exposure, enhance detail and create more polished, intentional edits.
This tutorial introduces the core concepts behind masking so you can build confidence before moving on to Lightroom’s individual masking tools.
2. Opening the Masking Panel
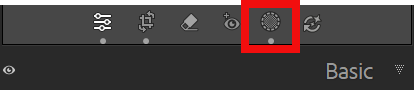 The Button to Open the Masking Panel
To open the Masking Panel click on the Masking button (red highlight), in the panel, just above the Basic panel in the Develop Module.
3. The Masking Panel
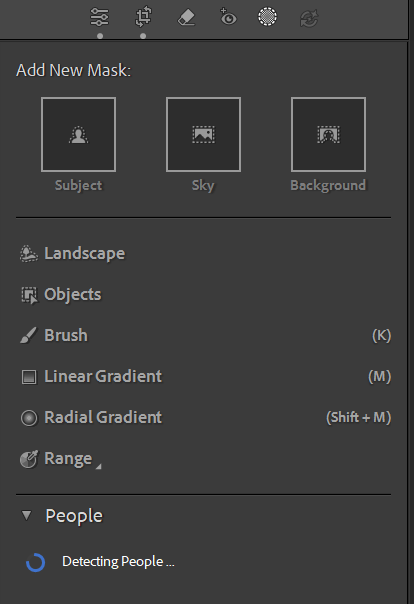 The Masking Panel opening, while still detecting People
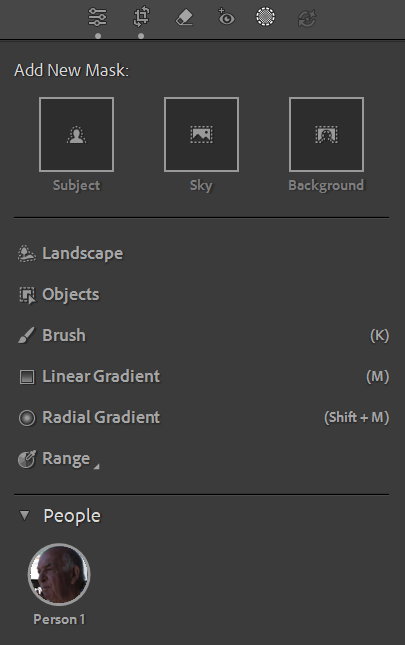 The Masking Panel open, after People are detected
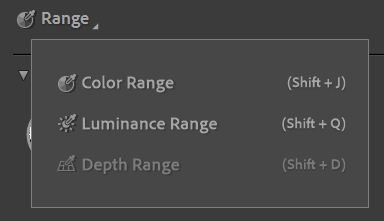 Range Options
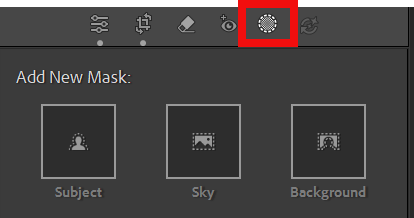
The top three items, Subject, Sky and Background will attempt to make an automatic selection of the main subject, the sky, or the background. The quality of the resulting mask will depend on the photo; contrast between the selected element and the rest of the photo, focus and sharpness, and the general content of the photo.
Plain skies are more easily selected than skies that are partially seen through the leaves and branches of a tree, (although I will create a tutorial on how to achieve a high quality result in this situation).
The landscape and Objects options will also attempt to automatically make an automatic selection and their results will also depend on the photo and its content.
Brush, Linear Gradient and Radial Gradient are used manually, but don't think they are inferior to the AI options above. Used correctly, in the right circumstances, they can produce excellent results. I use Linear and Radial Gradient a lot, which I will go into in a lot more detail in other tutorials.
Click on Range and you will see there are three options; Color Range, Luminance Range and Depth Range. Color and Luminance Range can be very useful in the right situation, such as the example I quoted above, of selecting a sky through leaves and branches of a tree.
Depth Range lets Lightroom use the depth information captured by cameras that record a depth map (such as iPhones in Portrait mode or some dual‑pixel cameras). Instead of selecting pixels based on colour or brightness, Depth Range selects areas based on their distance from the camera.
3. Lightroom’s AI Masks
 The Masking Panel opening, while still detecting People
Lightroom includes several AI‑powered masking tools that automatically detect important areas of your photo. These tools are fast, accurate in most situations, and ideal for beginners who want quick results.
- Select Subject: Finds the main subject in the frame—perfect for portraits, wildlife and product shots.
- Select Sky: Detects the sky in landscapes and cityscapes, even when the edges are complex.
- Select Background: Creates a mask for everything except the subject, ideal for softening or darkening backgrounds.
AI masks are not always perfect. Accuracy depends on lighting, angles, contrast and how clearly the subject stands out, but they provide an excellent starting point for most edits. And for many edits, they will be all you need.
4. Manual Masking Tools
When AI masks are not’t enough, or when you need more precision, Lightroom’s manual tools give you full control. These tools let you paint, blend or target specific areas based on tone or colour. We'll look into these in more detail in coming tutorials, but I use Radial and Linear Gradients a lot, with great success. Color and Luminance Range can also be very useful when dealing with some areas, for example, leaves and branches of trees.
- Brush: Paint your own mask with adjustable size, feather, flow and density.
- Linear Gradient: Ideal for skies, foregrounds and gradual transitions.
- Radial Gradient: Perfect for portraits for lightening a face in shadow, vignettes and spotlight effects.
- Color Range: Targets specific colours—great for foliage, clothing or correcting colour casts.
- Luminance Range: Selects areas based on brightness, allowing precise highlight or shadow control.
These tools give you the flexibility to refine AI masks or build your own from scratch.
5. Add, Subtract and Intersect
Lightroom becomes far more powerful when you start combining masks. Instead of relying on a single selection, you can build complex, precise masks using Add, Subtract and Intersect.
Your initial mask might be great, but it includes and area that you don't want, or doesn't include an area that you do want. This is where Add, Subtract and Intersect can be very powerful.
- Add: Expands your mask by including more areas, which is useful when AI misses part of the subject.
- Subtract: Removes unwanted areas from a mask, helping you clean up edges or refine selections.
- Intersect: Creates a mask only where two selections overlap—ideal for advanced, highly targeted edits.
These three options are the key to mastering masking. Once you understand how they work, you can create selections that are both accurate and beautifully controlled.
Continue learning masking in Lightroom
Select Subject - Includes a downloadble photo so you can follow along
Select Object - Includes a downloadble photo so you can follow along
