Page updated: 14 June 2026
Lightroom Exposure vs Whites vs Highlights
Understanding How Exposure, Whites and Highlights Affect Your Image
Introduction: Exposure vs Whites vs Highlights
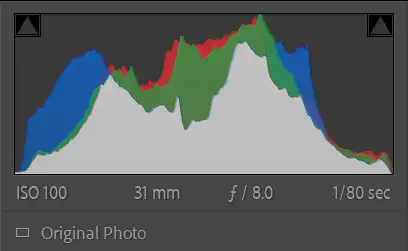
The Basic panel in Lightroom Classic includes several sliders that all seem to brighten or darken an image, but each one affects a different part of the tonal range. Exposure, Whites and Highlights may look similar at first, yet they each shape the histogram - and your photo - in very different ways.
In this tutorial, you’ll learn exactly what each slider controls, how they interact with one another, and how to use them without losing detail in bright or upper‑midtone areas. You’ll see how Exposure adjusts the overall brightness of the entire image, how Whites set the brightest point in the histogram, and how Highlights recover or enhance detail in the bright midtones.
This is a practical, beginner‑friendly guide designed to help you understand the top half of the histogram and build a more confident editing workflow.
Related tutorials.
The HistogramPhotoshop Histogram Panel
ON THIS PAGE
Exposure
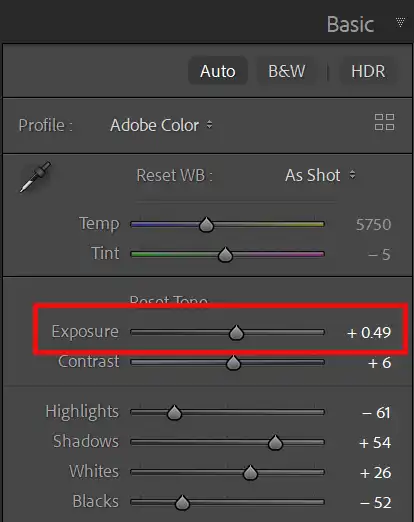
The Exposure slider adjusts the overall brightness of the entire image. It moves the whole histogram left or right, affecting shadows, midtones and highlights together. Exposure is the closest digital equivalent to changing the exposure in‑camera.
If the whole photo feels too dark or too bright, Exposure is the slider to start with. It sets the foundation for all other tonal adjustments.
Exposure affects the central part of the histogram most strongly, but it still influences the entire tonal range.
Whites
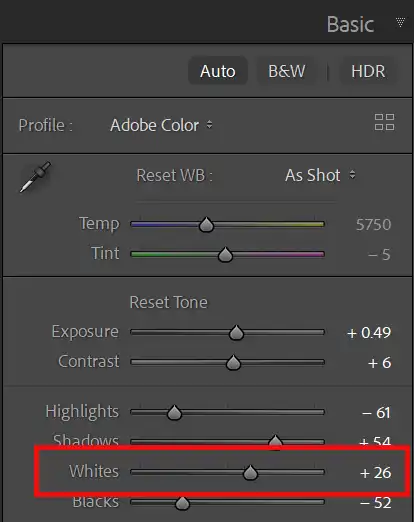
The Whites slider controls the brightest tones in the image — the far right edge of the histogram. It sets the white point, determining how bright the brightest pixels can become.
Increasing Whites expands the highlight range and can add sparkle to reflective surfaces, skies and wedding dresses. Reducing Whites protects detail in bright areas and prevents clipping.
Use the clipping warning triangles or press J to see exactly when the whites begin to lose detail.
Highlights
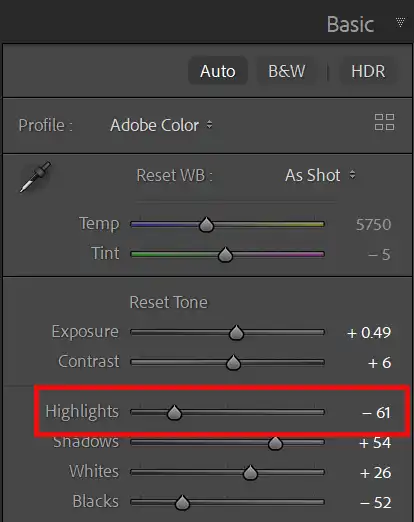
The Highlights slider affects the bright midtones — the area just left of the Whites. These are tones that are bright but not pure white, such as skin highlights, clouds, pale clothing and reflective surfaces.
Reducing Highlights is one of the most effective ways to recover detail in bright skies or shiny surfaces. Increasing Highlights adds contrast and brightness to the upper midtones without blowing out the whites.
Highlights give you control over bright detail, while Whites control the brightest pixels themselves.
How These Sliders Work Together
Exposure sets the overall brightness. Highlights refine the bright midtones. Whites set the brightest point in the image. Together, they give you precise control over the right half of the histogram.
A typical workflow might be:
- Set Exposure for overall brightness
- Lower Highlights to recover detail
- Raise Whites to add contrast and brilliance, but avoid clipping
This combination gives you a bright, clean image without losing detail in the highlights.
Common Mistakes
Beginners often confuse these sliders because they all affect brightness. Here are the most common issues:
- Using Exposure to fix blown highlights — use Highlights or Whites instead.
- Overusing Whites — this causes clipping and harsh contrast.
- Ignoring the histogram — it shows exactly what each slider is doing.
- Trying to brighten the image with Highlights — use Exposure for global changes.
Understanding the role of each slider makes editing faster, cleaner and more consistent.
Next Steps
Now that you understand how Exposure, Whites and Highlights shape the top half of the histogram, the next step is to learn how the Shadows and Blacks sliders control the lower half.
Together, these controls give you complete command over the tonal structure of your images.
Continue with the Develop Basics tutorial or explore the Lightroom Learning Path to build your editing workflow step by step.
