Page updated: 11 April 2026
Layers - The Basics
Layers are an essential part of Photoshop and are used all the time in image editing, so it’s important to become familiar with them. This is intended as an introduction to layers for beginners. These essentials will get you started.
There are so many elements to the Layers Panel that it can seem overwhelming at first. We will look at just the parts you need to understand first, to get started.
When you open a jpeg image, it will only be one layer, named "Background". Jpeg images are always only one layer. But once you start doing other things, extra layers will nearly always be added.
What are Layers?
Each layer in an image contains a part of the total image content, or an adjustment that is applied to the image. Each layer can be visible, or hidden and this will affect how the image looks.
The order that layers are "stacked" will also affect how the image looks. Imagine looking down on a pile of papers. The one you see is the one on top. In a "layer stack", the topmost layer is the one you will see first. If there is transparency in that layer, you will see the contents of the next layer down, and so on.
Related subjects;
Adjustment Layers
Layer Masks
The Histogram
ON THIS PAGE
The Layers Panel
If you are not familiar with Layers, here are the basics, to get you started.

Layer Visibility (pink & green boxes). Click on the eye icon to turn layer visibility on or off. When the layer is hidden, the viewer will see the layer underneath (if it is visible). When the layer is visible the viewer will only see any layers under that layer if the layer has transparent areas.
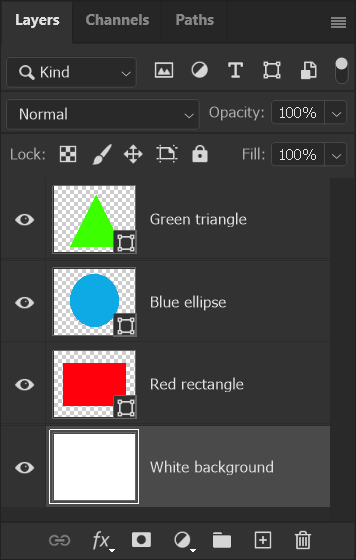
In this image, each of the three layers contain a shape and the rest of the layer is transparent.
Layer Opacity (red box). If the opacity is less than 100%, there will be a degree of transparency. If opacity was 0%, the layer would be totally transparent.
Layer Name (blue box). You can name your layers and I recommend that you do. Double click a Layer Name and it will highlight, ready for you to edit. It will help avoid selecting the wrong layer. The more layers you have, the more useful layer names are. Take care to double click on the Layer Name, not another part of the layer, as that will have different results, depending where you double click.
Selected Layer (lilac box). Click on a layer to select that layer. It will then be highlighted a different color and there is a white box around the layer thumbnail. Any action you perform will happen to that layer, provided it's visibility is turned on. If you can't see anything happening, it may be that the layer will be hidden by another visible layer.
Layer Thumbnail (cyan box). The Layer Thumbnail gives a small representation of the contents of the layer.
New Empty Layer (orange box). Click to add a new empty layer. Some tools allow you to edit on an empty layer, which preserves the original image layer, or layers beneath it. This is preferable to editing directly on a layer, which would change the pixels.
Delete Layer (purple box). Click on a layer and drag it to the trash can to delete it. You can also select a layer and press the Delete key on the keyboard.
Understanding Layers. Example 1


In this image, there are 4 layers - 3 layers each containing a shape and a 4th layer containing white, as a background. They are all visible, as indicated by the "eye" icon on each layer.
We see the green triangle because it is the topmost layer. Then we see the blue ellipse as it is the next layer down. Then we see the red rectangle. The white background is visible
Example 2 - Transparency

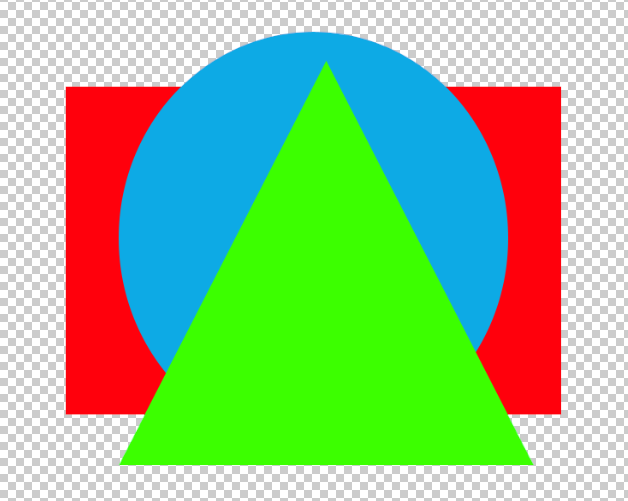
Visibility for the white background layer has been turned off, as indicated by the missing "eye" icon on that layer. We then see the transparent areas on all three of the shape layers. Transparency is represented by the checkerboard pattern. By default this is gray and white, but color can be changed.
Note that the jpeg format does not support transparency, so if you saved, or exported this image as a jpeg, the background would be white.
To preserve layers, save in the .psd Photoshop document format, or the .tif format. I recommend the .psd format.
For more information see Image Formats.
Example 3a - Hidden Layers
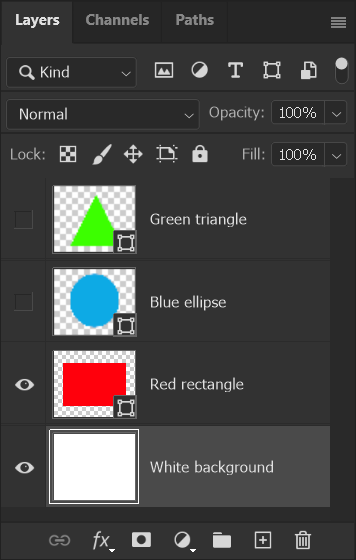

Visibility has been turned off for the green triangle and the blue ellipse layers, so we only see the red rectangle against the white background.
Click the "eye" icon for each layer to show or hide that layer.
Example 3b - Hidden Layers

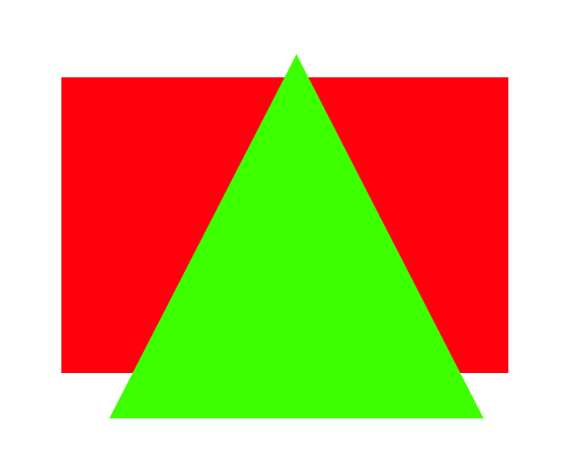
Visibility for the blue ellipse has been turned off, so we see the green triangle on top of the red rectangle, with the white background behind them.
Example 4a - Change Layer Order

To move a layer up or down the layer stack, click on the layer and drag it.
Watch for the blue line, which indicates where the layer will be moved to, when the mouse button is released.
Example 4b - Change Layer Order
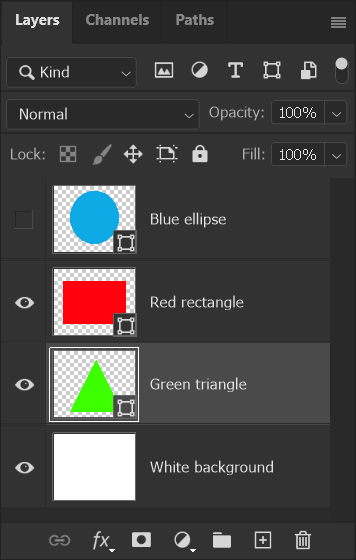

This is the result of the previous example, where the green triangle layer has been moved to be under the red rectangle. The blue ellipse layer is hidden, so we see the red rectangle on top of the green triangle, on top of the white background.
Example 5 - Layer Opacity
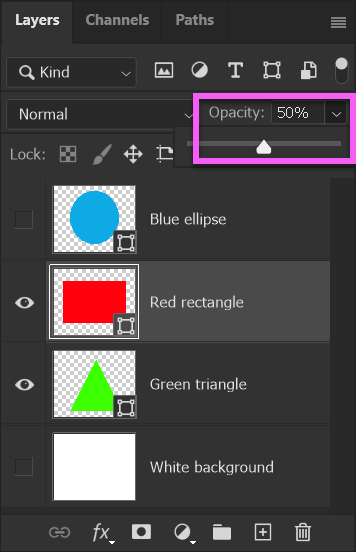

To adjust Layer Opacity, first select the layer, by clicking on it. I have selected the red rectangle layer.
To adjust opacity, click in the opacity box and drag the slider. You will see the result in real time while you drag, but the layer thumbnail remains 100% opaque.
Example 6a - Add a New Layer
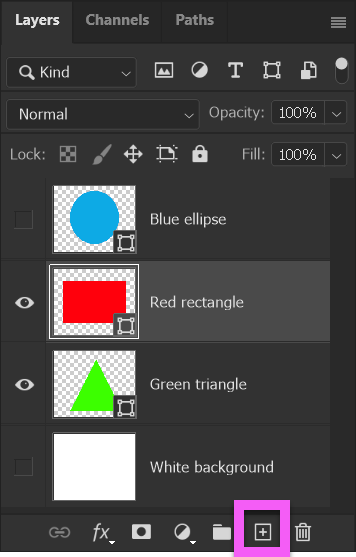

I have returned the red rectangle layer to 100% opacity.
To add a new layer, click on the New Layer button (highlighted in pink).
Whenever you add a layer, it is always added immediately above the selected layer. In this case the red rectangle layer was selected.
Example 6b - Add a New Layer


The new layer has been added immediately above the red rectangle layer, as that was the layer that was selected when the new layer button was clicked.
If the new layer is not in the right position in the layer stack, you can click and drag to move it up or down. See above examples for moving a layer.
You won't see any difference in the image, as the new layer is empty.
Example 6c - Add a New Layer


I have selected the Brush Tool and a dark blue color and painted a line, so you can see some content on the new layer.
For more details see the Brush Tool and Color Picker.
Example 7a - Resize the Layers Panel
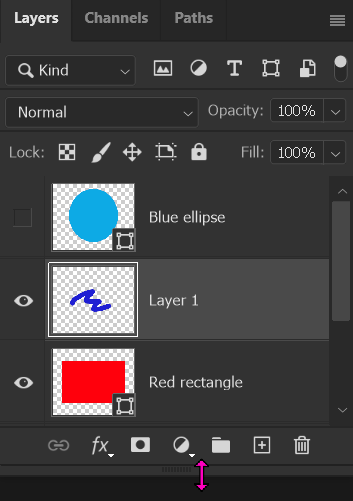
I recommend that you adjust the Layers panel, so that you can see all layers without scrolling.
If you can't see all layers at a glance, without scrolling, there is an increased possibility of making an error in selecting the correct layer. It's also inconvenient to keep scrolling up and down the layers.
Move the cursor over the bottom of the Layers panel and watch for the two-way arrow, which indicates resizing. Click and drag to resize.
You can also resize the width if you wish, to view longer layer names.
Example 7b - Resize the Layers Panel

Now the panel is longer, you can see all the layers without scrolling. I recommend you do this, especially beginners, although I do this as well. If you are able, it helps to have second screen. My second screen is rotated 90 degrees, so that it is vertical, so I can have a very long Layers panel (and other panels).
Summary of Layers - Basics
Layers are an important part of Photoshop and editing images. The above examples show the first things a beginner should learn about Layers; layer visibility, transparency, layer order and moving layers. There is much more to layers than is covered here.
Be aware at all times, which layer is selected, because that is the layer that will be affected by an action you take or a tool you use - even if you can't see the layer.
Troubleshooting
Questions to ask yourself, if you can't see anything happening
If you do something but can't see anything happening, ask yourself these questions. They will solve most problems of not seeing anything happening.
Am I on the right layer? Check that you haven't selected the wrong layer, which could be beneath other layers.
Is layer visibility turned on? You may have selected the correct layer, but the layer visibility is turned off. Some actions can still happen when a layer is not visible, but many actions won't be possible for a hidden layer.
Is the layer visible?You may have selected the correct layer and layer visibility is turned on, but the layer may be obscured by other layers above it.
Is there a selection active?If you have used any selection tools, there may be a selection active, which will prevent you from doing some tasks. For other tasks it may be that your actions will be applied to the selection. To deselect, from the menu: Select > Deselect. Or use the keyboard shortcut Ctrl+D, or click outside the image.
Have you confirmed a resize, or transformation?If you have used the Move tool to resize a layer, and you haven't committed the change (by clicking the tick on the Options bar, or pressing Enter) you won't be able to continue.
