Page updated: 24 March 2026
Background Eraser Tool
The Background Eraser Tool is one of many brush based tools in Photoshop. It "erases" the background, but how this works depends on which Sampling option you choose and then additional options..
If you use appropriate Sampling and other options, it can do a very good job of erasing a background.
However, there are other tools and techniques that provide a better solution, which I'll describe more fully in the summary, below.

ON THIS PAGE
Background Eraser Tool Options
Tool Presets

You can create and save a Tool Preset for any tool, which will remember settings that you choose for that tool, so you can quickly and easily select different presets and settings for a particular tool. The degree of usefulness of presets varies, depending on the tool.
You can reset any tool back to its default settings by right clicking on the Tool Presets button and select Reset Tool. Take care not to Reset All Tools, unless that is intended.
Brush Presets

Here you can change size and hardness and select from a range of brush presets. There are many brushes available and you can also create your own.
Sampling: Continuous

While you are brushing over the background, the tool continuously samples the different colors your cursor is moving over.
Use this option when the background is not a single color, but changes colors, or tones of a color.
Sampling: Once

This mode will take the first area of color of the background that you click on and then will apply that color to the remainder of the selection.
If your background is a similar color and tone, this could be a good option.
Sampling: Background Swatch

This option will sample the Background Color. Before you start with this tool to erase the background, you must first set the Background Color.
Click in the Background Color and the Color Picker will open. Select your color by clicking on the chosen area.
The Background Eraser tool will then just erase the background that matches the Background Color.
For more information see Foreground and Background Colors and Color Picker.
Limits

Contiguous: This will only erases pixels that are touching the pixel under the plus sign (in the middle of the brush). You must keep the + sign over the area to remove. If it goes over an area you want to keep, it will also erase it.
Discontiguous: This erases any pixels that match the color you're erasing, even if they're not in the same area as the plus sign
Find Edges: Erases up to edges that it finds
Tolerance

Tolerance controls how dissimilar a color can be from the chosen color for the tool to delete it. The default Tolerance is 50, but you may need to reduce this, depending on your image - as in the example below.
Brush Angle

If you have a non round brush, you can change the angle of the brush.
It won't make any difference on a round brush.
For the Background Eraser Tool, I recommend a round brush most of the time.
Protect Foreground Color

This can be useful when the color you want to erase is similar to the color of what you don't want to erase.
Pressure Sensitive Size

If you have a pressure sensitive pen and tablet, you can turn on this option, so brush size is controlled by the pen pressure. If this is off, size will be controlled by brush settings.
For non pressure sensitive users, the best way to change brush size is with the square brackets keys [ ].
How to use the Background Eraser Tool
This guide will show you how to use the Background Eraser Tool. It works well in many situations, but less well in others. However, there are better alternatives, which are both quicker and produce a better quality result, which I explain in the Summary, at the bottom of this guide.
1. Background Eraser Tool

Select the Background Eraser Tool from the toolbar. Like most tools, it shares the button with other tools and the one that is visible will be the last tool used.
2. Limits Options

Decide which Limits option to use.
Contiguous: This will only erases pixels that are touching the pixel under the plus sign (in the middle of the brush). Select this option if the area you want to remove has different colors. You must keep the + sign over the area to remove. If it goes over an area you want to keep, it will also erase it.
Discontiguous: This erases any pixels that match the color you're erasing, even if they're not in the same area as the plus sign
Find Edges: Erases up to edges that it finds
3. Background Layer Unlocked

When you begin to use the tool, it automatically unlocks the background layer, so if there are no layers underneath the selected layer, you will see transparency (represented by the checkerboard pattern).
I have used the default settings of; Continuous Sampling, Contiguous Limits and 50% Tolerance. At first glance they seem to have done a great job. See the next step for where it wasn't perfect.
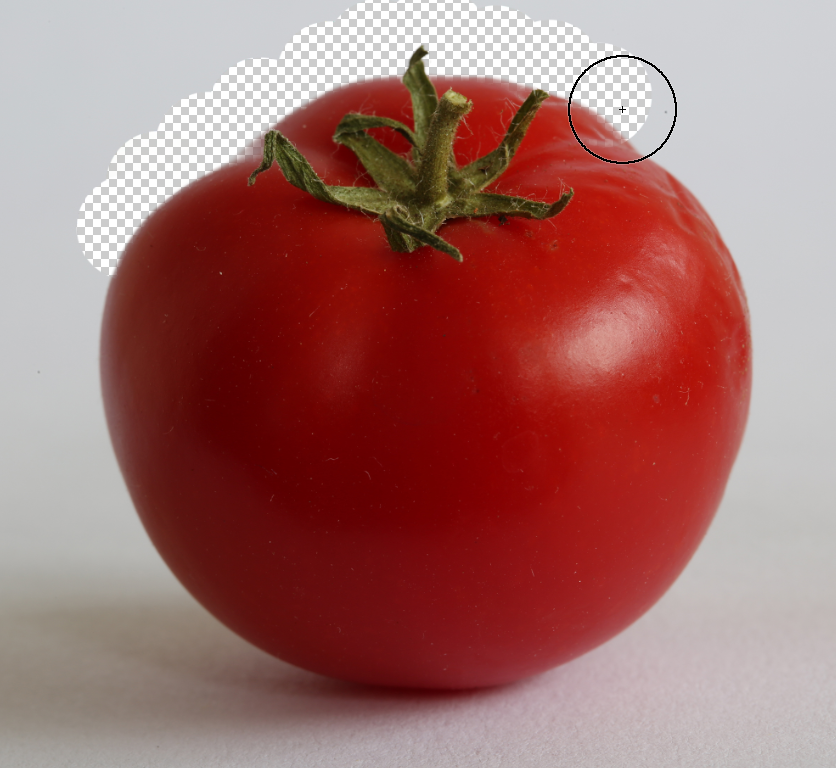
4. Default Tolerance

At the default Tolerance setting of 50, part of the tomato has been erased.
5. Reduced Tolerance

At a reduced Tolerance setting of 15, it's done a better job of not erasing this part of the tomato.
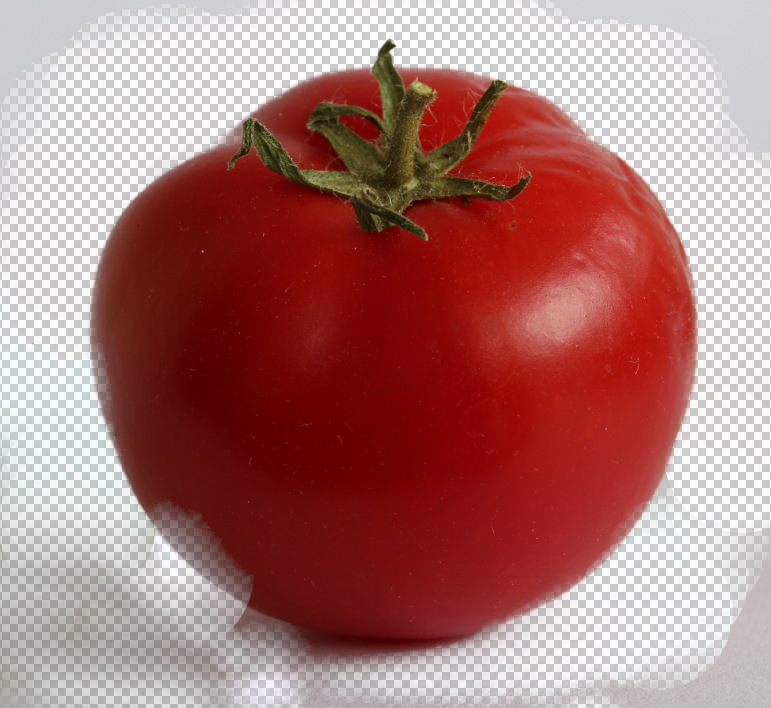
6. Tolerance Limitation

At the same Tolerance setting of 15, it's not done well at the bottom of the tomato, where there is shadow, which is more similar in tone to the tomato, than at the top and sides of the tomato.
And this is not even going into the darkest parts of the shadow.
7. Result

When I tried to remove the darkest parts of the shadow, this is the result.
8. Sample Once

This is using Sample Once. Each time you begin a stroke it samples from where you click, under the + sign. Then it removes this color for the rest of the stroke, so you don't have to be careful about not going over the subject (provided it's a different color).
This is the result of the default Tolerance of 50.
The next step is a close-up of the bottom of the tomato.
9. Sample Once close-up

This is a close-up of the previous step (using a Tolerance of 50).
10. Lower Tolerance

This is the same area, but with a Tolerance of 15%.
Better, but still not great.
11. Sampling option

This is using the Sampling option of the Background Color. Click on the Background Color, which opens the Color Picker, then click on an area in the image you want to remove. That color is selected and when you paint, that is the color you will remove (and similar tones, depending on the Tolerance setting).
In this image, I firstly selected a color from near the top of the tomato, then midway down, then a couple of the darker areas at the bottom (but not the very darkest - which I do in the next step). This is the result.
12. Dark part of shadow

This is the result when I select a color from the darkest part of the shadow.
13. Comparison of Background Eraser vs Object Select Tool

With the Object Select Tool, just holding the cursor over the tomato highlights an almost perfect selection of the tomato, except for the green bit at the top.
14. Result of previous step

This is the result of the previous step. True, it didn't select the green bit, but it's done a great job of selecting the tomato, including the shadow area at the bottom that caused problems for the Background Eraser.
15. Object Select

Let's try the Object Select tool again, but this time drag a selection around the tomato, instead of clicking on it.
See the next step for the result.
16. Result of previous step

This is the result of the previous step. I unlocked the background layer (click on the lock icon) and inverted the selection, (Ctrl+Shift+I, or from the menu; Select > Inverse, then pressed the Delete key.
I would normally use a Layer Mask, but to make a direct comparison to the Background Eraser, I deleted the pixels instead.
This took just a few seconds to achieve a far superior result, compared to minutes and a steady hand with the Background Eraser...and all for an inferior result.
Summary of the Background Eraser Tool
The Background Eraser Tool attempts to erase the background. As you can see from the above example, it's not a perfect tool. True, I didn't try all the options, but I did try a few key options. The truth is that it's just not worth spending time trying different options, because there are other tools in Photoshop that will do a better job and do it more quickly. Tools such as the Object Select tool, Quick Selection Tool.
The comparison with the Object Selection Tool shows how pointless it is to try erasing a background with this tool, when there are far superior tools.
The tomato is a simple image that should make it easy for the tool, as it did for the Object Selection tool. With more complex images, the results are worse.
When you want to remove a background use another tool, but which one is best will depend on the image. Start with the Object Selection tool. For more information and a detailed look, see my guide to the Object Selection Tool, Quick Selection Tool, Magic Wand Tool.

