Page updated: 25 March 2026
Vertical Type Tool
The Vertical Type Tool allows you to add vertical text to your images. There are two types of text;
- Point Text: Click and add your text. Point Text does not wrap, as there is no container for it to wrap within.
- Paragraph Text: Click and drag to create a textbox. When you type, your text will wrap within the textbox and you can align text; Top, Middle, Bottom, just as you can in word processor programs.
You can easily switch between Point and Paragraph text by right clicking on the layer and selecting the other option.

Vertical Type Tool Options
ON THIS PAGE
Tool Presets

You can create and save a Tool Preset for any tool. This will remember settings that you choose. Presets for brushes are much more useful than for some tools. If you wish to use presets, you have the option of either creating a tool preset or a brush preset. Right click on the Tool Presets button to reset the tool to default settings.
Text Direction

Toggle to change the direction of the text between horizontal and vertical.
Fonts

Search for fonts, filter fonts, see a preview of the font, add to your Favorite fonts
You can filter the fonts; Show Adobe Fonts (highlighted in red). Show Variable Fonts (highlighted in green). Show Favorite Fonts (highlighted in pink). Show Similar Fonts (highlighted in blue).
Font Style

Select the style of font. This will vary, depending on the font. Some have many styles and others only have a few styles available.
Font Style Scrubby Slider

This is a great way to change font size. Highlight the text, then click on the Scrubby Slider and drag to the right or left. Look for the icon of the hand with the left and right arrows.
Dragging to the left will decrease the font size and dragging to the right will increase the font size.
As you drag, you get a live preview of the size.
Font Size

The Scrubby Slider (immediately above) is a great way to change font size, with a live preview, but you can also change font size with this drop down list.
This is the same as in word processors. If you need a specific font size, select it from this list.
Anti Alias Method

Anti-alias smoothed out lines, which of course, there are a lot of in text. There are some options for different anti-alias methods. Try them out and see which you prefer.
Text Alignment

This works the same as in word processors. Align text to the Top, Middle, or Bottom of the textbox.
This option is only valid in Paragraph Text, where text is within a box. It does not apply to Point Text.
Font Color

Click in the Font Color box to open the Color Picker to choose a color.
For more details see Color Picker.
Warp Text


Click on this button to open the Warp Text options.
Character and Paragraph panels


Click on this button to open the Character and Paragraph panels.
There are lots of options in each of these panels to format your text.
How to use the Vertical Type Tool

This tool works the same as the Horizontal Type Tool, which users should be more familiar with. Please see that guide for more details.
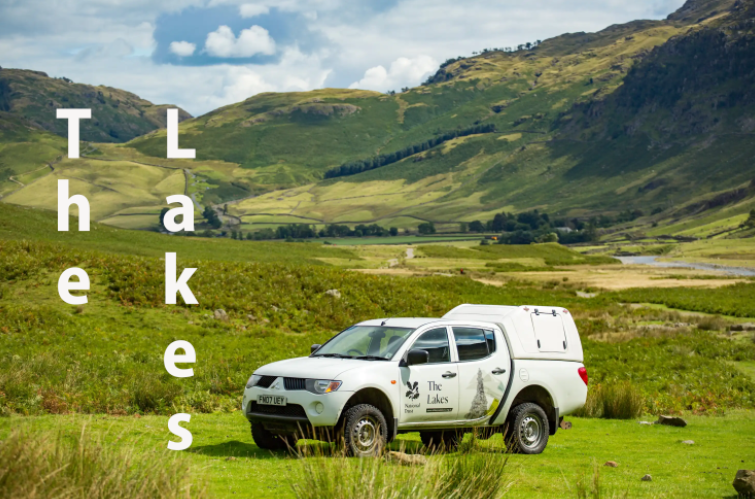
The Vertical Type Tool adds text vertical, letter by letter. If you want text rotated, then use the Horizontal Type Tool and rotate the layer 90 degrees.
This is an image of the Lake District in the UK. We'll add some text and we'll also look at the difference between Point Style text and Paragraph Style text.
Vertical Type is best suited to short text. Horizontal text can include whole paragraphs. That would clearly not work vertically.
1. Select Vertical Type Tool

Select the Vertical Type Tool from the toolbar. Like most tools, it shares the button with other tools and the one that is visible will be the last tool used.
2. Click and Type

After selecting the Vertical Type tool, move the cursor over your image and you will see the cursor has changed.
Just click in your image. It doesn't matter where, as you can easily reposition this at any time.
When you click to add text, a new Type Layer is added immediately above the currently selected layer.
Clicking in your image inserts Point Text. We will look at Paragraph Text later.
3. Backwards Text

If you press Return, to create a new line, the text runs backwards.
4. Multiple Text Columns

If you want multiple columns of text, create each line on a separate layer.
Summary of the Vertical Type Tool
The Vertical Type Tool allows you to add text that runs down the image. It is really suited to small amounts of text and if you want more than one column, apply the text for each column on a separate layer.
Apart from the direction of the text, the Vertical Type Tool works in just the same way as the Horizontal Type Tool, so see that tool for more details.
Also see the Horizontal and Vertical Type Mask Tools for cool effects with text in your image.

