Page updated: 24 March 2026
Foreground & Background Colors
Foreground & Background Colors are an important part of Photoshop.
Unlike most other tools, they are not used on their own, but with other tools, such as Layer Masks. In fact they are used a lot with layer masks, helping you to add or subtract from the layer mask, by switching the Foreground and Background Colors.
For a complete list and description of all Selection Tools, see Selection Tools Summary.
Unlike most tools on the Toolbar, Foreground & Background Colors do not have an Options bar, or any options.

ON THIS PAGE
1 or 2 Column Toolbar


You can choose between having a 1 column, or a 2 column toolbar. (In the screenshot, the 1 column toolbar is shown first and is narrower).
They both contain exactly the same elements, but in a slightly different arrangement.
To change between a 1 column and 2 column toolbar, click on the double chevron >> at the top of the toolbar.
Single Column Toolbar

Tap to view full size
Rotate your phone for easier reading
This is the 1 column arrangement.
Two Column Toolbar

Tap to view full size
Rotate your phone for easier reading
This is the two column arrangement.
Foreground Color

The Foreground Color is on top. When you paint with a brush, or similar tool, you will be painting with the Foreground Color.
If you click on Foreground Color you are able to select a new Foreground Colour.
If you are editing a Layer Mask, you will be painting with the Foreground Colour. On a Layer Mask that will be black or white, or a shade of grey, regardless of the colors showing in Foreground Color.
Background Color

The Background Color is in the background. It is sometimes invoked through keyboard shortcuts, but otherwise it remains in the background.
When you Switch Foreground and Background Colors, (see below) they swap places. The Foreground Color becomes the Background Color and the Background Color becomes the Foreground Color.
This may seem unimportant, but it's very important when editing Layer Masks.
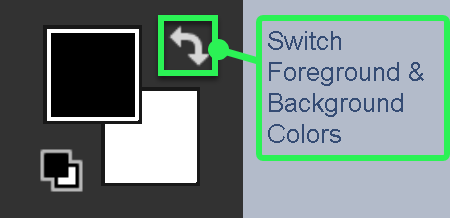
Switch Foreground & Background Colors

Click this button to switch Foreground and Background Colors.
A better keyboard shortcut is to press the X key.
That is so quick and so easy. We tend to do what is quick and easy.
Default Colors

The default colors are black and white. You can click this button to set the Foreground and Background Colors to black and white. A better options is to press the D key. Photoshop recognizes that this is such an important function that it allocates a single key to the shortcut - D (upper or lowercase).
When working with Layer Masks, this is a step I strongly recommend - that you press the D key to ensure you are starting with default Foreground and Background Colors.
Change Foreground & Background Colors
1. Click on Foreground Color

To select the new color you wish to change to, click on the Foreground color. In this screenshot it is the black square, but it could be any color. This will open the Color Picker.
The Foreground Color is always the square "on top". The square below it is the Background Colour.
2. Select a Color

By default the Color Picker starts on red, as that is at the top of the Color Slider (the vertical bar, highlighted in green).
Select your color in the Color Slider. You can also click and drag the small white triangles at the bottom of the Color Slider.
Then click in the Picked Color area (highlighted in pink) to select the tone.
You can also select a color outside the color picker, from any open image. Just click on the area in the image.
Click OK to close the Color Picker.
2. Adjust Color Slider

If you haven't selected exactly the colour you wanted, you can click and drag the small triangles on the vertical bar (highlighted in green) and drag them to find a better color.
3. Selected Color

The circle (highlighted in green), shows where I clicked to select a color.
4. New Color is shown

After selecting the color, note that the new color is shown in a box with the old color (highlighted in green). You can click again, if you didn't achieve the desired color.
Note that there are warnings that the color isn't a "web safe" color. this relates to older computers with 8-bit color, which could only display a limited range of colors. Modern graphics cards produce 24-bit color, so this is not something you need to worry about.
5. Ignore Web Safe Colors

You can safely ignore the web safe colors warnings, but in case you're curious, this is what web safe colors look like.
A much more limited range of colors, which was all that older computers could display.
Thank goodness for progress and modern graphics cards!
6. Add Color Swatch

If you wish, you can add the color to Swatches (highlighted in green), where it will be saved, so you can use it again. Personally, I've not found this particularly useful in image editing, although it can be useful when working with other projects.
You can also add it to Color Libraries (highlighted in red). This is more useful if your Creative Cloud subscription includes other apps, such as InDesign or Illustrator, where you can use this color. If you have a photography or Photoshop subscription, this is not as useful.
7. Name Color Swatch


When you click on the Add to Swatches button, you will be offered the chance to name your color swatch.
8. Click on Background Color

To change the Background color, click directly on Background Color.
Or you could switch Foreground & Background Colors, by pressing the X key. Then what was the Background Color would now be the Foreground Color.
Anyway, let's click on Background Color.
9. Color Picker

Again, this opens Color Picker. Note that in the top (white background), it says in brackets "Background Color".
10. Select a Color

I've highlighted in green, the area I've clicked on in the vertical bar.
If you wish to fine tune the color, click and drag the small triangles (highlighted in green).
11. Selected Color

The circle shows where I have clicked to select a color.
12. Switch Foreground & Background

Here are the new Foreground & Background Colors.
To Switch them, click on the double-headed right angle arrow ... or much better, just press the X key on the keyboard. This is one of the best shortcuts. For more shortcuts see Keyboard Shortcuts
13. Switched Colors

After pressing the X key, or the Switch button, the Foreground & Background Colors are switched. You will find this particularly useful when working with Layer Masks.
Summary of Foreground and Background Colors
Foreground & Background Colors are an important part of Photoshop that are used a lot, in many different scenarios.
They are used a lot with Layer Masks, but also with selecting colors for Swatches or to fill selections or layers.
