Page updated: 18 July 2026
Interactive Photoshop Toolbar PDF (2026)
Preview and download available on the Tools page.
Patch tool
The Patch tool is one of many tools for removing unwanted areas from an image, or for adding areas or patterns. It's like having a large Healing Brush and like the Healing Brush it's effective at blending different levels of brightness and different areas.
However there are differences to the Healing Brush. In Normal mode (which I find the most useful), it can only work on the layer containing the content, not on a new empty layer. So I would recommend duplicating the layer you wish to patch, to preserve the original.
Unlike the Healing Brush it gives you a preview, as you drag the selection to a new area to patch from (in Source mode, which I prefer).

Patch tool Options

Tap to view full size
Rotate your phone for easier reading
ON THIS PAGE
Tool Presets

You can create and save a Tool Preset for any tool, which will remember settings that you choose for that tool, so you can quickly and easily select different presets and settings for a particular tool. The degree of usefulness of presets varies, depending on the tool.
You can reset any tool back to its default settings by right clicking on the Tool Presets button and select Reset Tool. Take care not to Reset All Tools, unless that is intended.
Selection Buttons

Many of the Selection Tools have these four buttons. Left to right, they are;
New Selection - Click to cancel existing selection and create a new selection
Add to Selection - Add to any existing selections
Subtract from Selection - Remove from existing selections
Intersect with Selection - Create custom shapes
Mode

You can select from different blend modes, for different effects.
However, for the usual purpose of removing an unwanted area or object, I recommend using the Patch tool in Normal mode.
Source or Destination

You have a choice about how to use this tool.
Source Create a selection around the area you want to remove, then drag it to an area to replace the unwanted area.
Destination create a selection around the area you want to replace the unwanted area and drag it over the unwanted area.
I prefer to use Source, as I can then accurately create a selection around the object or area I wish to remove. Working with Destination makes it difficult to create an accurate selection, so to ensure you covered the required area, your selection could be larger than it needs to be. A good technique with removing areas with any tool, is to remove what you need, but don't edit areas of the image that you don't need to touch. This will usually give you a better result.
If you want to copy an area to another area, Destination could be a good option.
Transparent

Create a patch that is not completely opaque.
Use Pattern
You can blend a pattern into your image. You can choose from some preset patterns, or create your own.
Diffusion
The Diffusion slider affects how quickly the pasted area adapts to the surrounding image. Lower values are probably better for images with fine details and higher values being better for smooth images. In practice, I don't see much difference. Other factors will have more of an impact, such as the mode used and the area of the image.
1. How to use the Patch tool
Select the Patch tool from the toolbar. Like most tools, it shares the button with other tools and the one that is visible will be the last tool used.
2. Source or Destination
Select either Source or Destination. See above. To remove areas, I recommend Source, which will allow you to create a selection around the area you want to remove, then drag it to an area to replace the unwanted area. I prefer to use Source, as I can then accurately create a selection around the object or area I wish to remove. Using Destination, you must first select the area you will be replacing the unwanted area with, which makes it harder to create an accurate selection.
3. Click and Drag around area

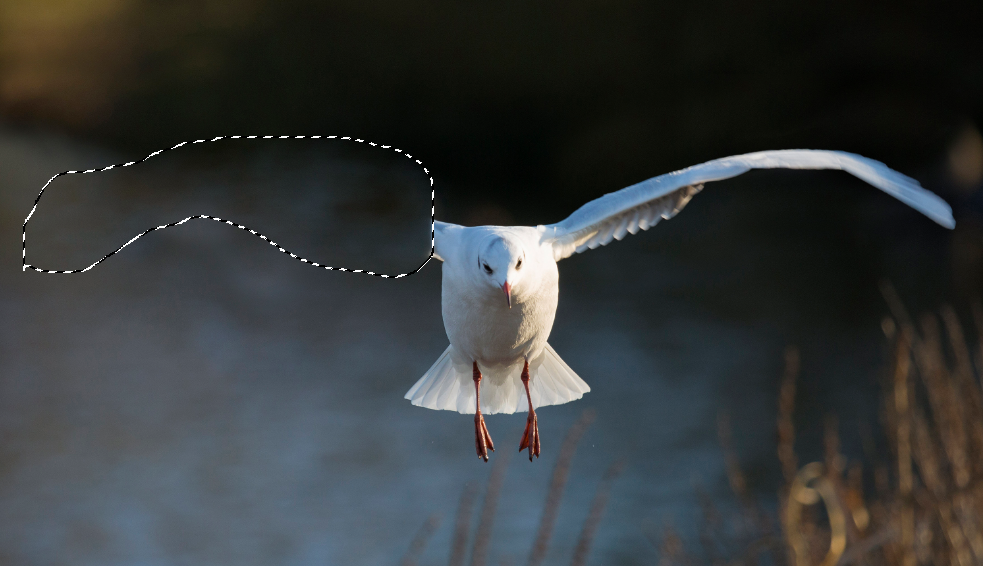
Click and drag to create a selection around the area you want to remove.
In this image I have not tried to select the whole bird at once, as there is not sufficient area in the rest of the image to then replace this with.
Instead, I've broken it down into parts. I have started by just selecting the left wing.
4. Observe the Cursor


Notice the cursor, just below the tip of the left wing. See the next step for details.
5. Source or Destination Cursors


These two cursors indicate the difference between selecting Source or Destination.
The right pointing arrow indicates Source, the left pointing arrow indicates Destination.
As I've mentioned, I prefer the Source option, which allows me to make a selection around the object I wish to remove, with greater accuracy than the Destination option. This results in less changes within the image, which is a good thing.
6. Drag Selection to Source Area

Drag the selection to an area you wish to clone from. In this image I've dragged the selection down to an area of blue.
Notice that I've not yet released the mouse button to complete the stroke, so the preview (showing in the original selection of the left wing), shows a perfect copy of the area I've dragged the selection to. Notice also in the next step, how, once you release the mouse button, the blending takes place, doing a great job of blending this selection into the new area.
7. Result of previous step
This is the result of the previous step. I've left the selection active, so you can easily see the area affected.
8. Image without Selection

And here is the same image without the selection active, so you have a clearer view.
The selection is deselected, either by pressing Ctrl+D (recommended), or from the Select menu; Select > Deselect.
The end result shows what a great job the tool does, even with large areas.
9. Select Right Wing

Then I've selected just the right wing, so there is room to patch it from the image.
10. Patch

Again, I'll patch it from the bottom left corner, to demonstrate how well the tool blends the new area in with the old. In this screenshot I have not yet released the mouse button, so you can see the new area in the preview of the original selection of the right wing.
11. Patching blends well

When the mouse button is released, it blends the area very well.
I've left the selection active, to clearly show the patched area.
12. Deselect for clear view

I've deselected, so you can see the patched area clearly.
Note that a small area close to the bird has been patched with a little of the bird, which is expected since the tool is blending the new pixels in with the existing pixels. These areas will be patched in the next step.
The selection is deselected, either by pressing Ctrl+D (recommended), or from the Select menu; Select > Deselect.
The end result shows what a great job the tool does, even with large areas.
13. Select final part

I have selected an area around the bird, including the blurred patched areas to the left and right.
14. Real time preview

Again, I have not yet released the mouse button, to show the preview of the new area, which clearly stands out against the original image.
15. Result is better than preview

When the mouse button is released, the patching takes place and it blends in well with the original image.
Again, I've left the selection active, so you can clearly see the patched area.
16. Final result.

The selection is deselected, either by pressing Ctrl+D (recommended), or from the Select menu; Select > Deselect.
The end result shows what a great job the tool does, even with large areas.
17. Patch a Pattern
To patch a pattern, first make your selection. The Use Pattern option is greyed out until a selection is made.
Then click on the drop down box.
18. Select a Pattern

Select a pattern. Here I've selected the first tree pattern.
19. Result of Patched Pattern
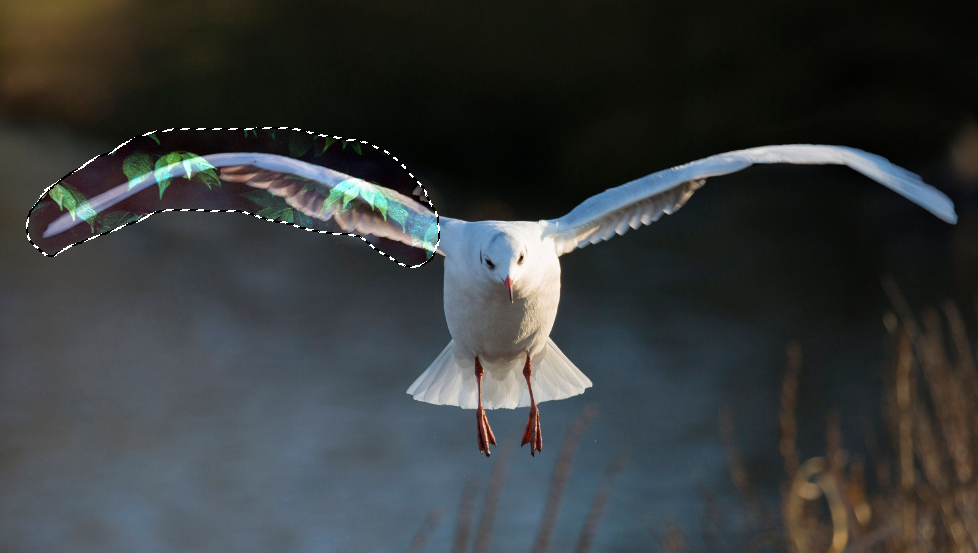
Here's the result, with the selection active, so you can see the area clearly.
20. Final Result

Here is the result without the selection.
Summary of the Patch tool
The Patch tool is a very effective tool to removing unwanted areas and, importantly, to blend the new content with the existing image.
I've found it particularly effective in removing large areas in an image and blending those areas well with the original content, as demonstrated above .
Todays AI Generative tools perhaps makes several removal / cloning / healing tools less important then they used to be, but the Patch tool is still a worthwhile tool to know.
Selection Tip
You don't have to make your selection with the Patch tool. That's mostly what users would do, but you can select an area with any selection tool, then switch to the Patch tool to do the patching.
