Page updated: 14 June 2026
Importing Photos into Lightroom Classic
A clear, step-by-step guide to bringing your images into Lightroom Classic
How Lightroom handles your photos
Lightroom doesn't’t store your photos inside the program. Your originals stay exactly where you put them — on a hard drive, an SSD, or an external disk. Lightroom simply records where those files live and stores your edits in its catalog.
Think of it like this:
- Your photos live on your drives.
- Your Lightroom catalog is a database that remembers where those photos are and what edits you’be made.
- Importing doesn't’t change your photos — it just tells Lightroom, “Track these for me.”
Once you understand that relationship, the import process becomes much easier. This tutorial walks you through choosing a source, setting a destination, and building a clean, reliable workflow.
Related tutorials:
A simpler Import workflow
Assisted Culling
What this tutorial covers
Before you start editing, Lightroom needs to know where your photos are stored and how you want them organized. This guide walks you through the entire import process — from choosing a source to setting a destination. Other tutorials will cover assisted culling, applying presets on import and adding keywords efficiently. This tutorial focuses on how Lightroom handles your files and how to set up a clean, reliable workflow.
ON THIS PAGE
1. Decide where to store your photos
Before importing photos into Lightroom, it helps to organize your folders first. A simple, consistent structure makes it much easier to find images later. Many photographers use a master folder for each year, with subfolders for different shoots or events. Using two‑digit numbers for months keeps everything in date order.
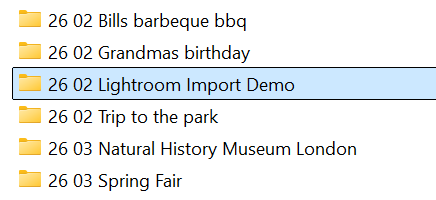
My own system is based around master folders for different subjects. For example, I keep all wedding work inside a Weddings folder, organized by year, then by each wedding. My general photos live in a Pictures folder, with each folder named using the year, month, and a short description. For example: 26 02 Lightroom Import Demo. This format has worked reliably for decades and makes searching fast and predictable.
Don’t worry if your photos are already in Lightroom and you want to reorganize them. You can move and rename folders inside Lightroom, or you can reorganize them in File Explorer or Finder. If you make changes outside Lightroom, simply right‑click the affected folder and choose Synchronize Folder so Lightroom updates its records. If you reorganize inside Lightroom, no extra steps are needed.
2. Open the Import dialog
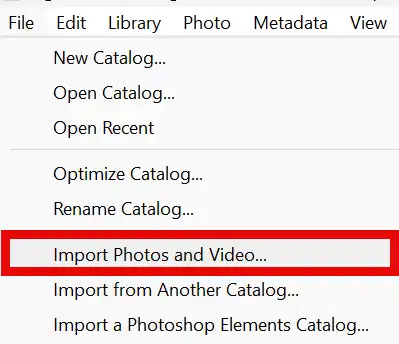
In Lightroom Classic, go to File > Import Photos and Video…. This opens the Import dialog, where you choose the source of your images and decide how Lightroom should handle them.
The Import dialog is the standard way to bring new photos into Lightroom, and it gives you full control over how your files are copied, organized, and added to your catalog.
3. Choose your photo source
On the left side of the Import dialog, select the location where your photos currently are. This might be a memory card, an external drive, or a folder on your computer. Lightroom will display thumbnails of the images so you can choose which ones to import.
Once you’be selected the source, Lightroom will show you how many new photos it has found and give you options for copying, moving, or adding them to your catalog. We’ll walk through those choices in the next steps.
4. Choose how Lightroom handles files
At the top of the Import window, pick one of:
- Copy as DNG – copy and convert to DNG.
- Copy – copy files to a new location, keep original format.
- Move – move files to a new location, remove from source.
- Add – leave files where they are, just add them to the catalog.
If you’re importing from a memory card, Copy is the safest choice. This leaves the original photos on the card until you’re certain they’be been copied successfully (and backed up!). Personally, I still copy files from the card to a folder on my computer using Windows File Explorer before importing. There’s no special advantage to doing it that way - it’s simply a habit I’be used for nearly three decades, and it has never let me down. I don't delete the photos from the memory card until I have backed up the photos and also the Lightroom catalog. The best, safest way to delete photos from a memory card is to format it in the camera.
My preference inside Lightroom is to choose Add, which leaves the files exactly where they are and simply adds them to the Lightroom catalog. If your photos are in raw format, this keeps them in their original raw form rather than converting them to DNG. I prefer this to Copy as DNG. In the past, when Lightroom introduced new features such as the excellent DeNoise, those features initially worked only with original raw files, not DNGs. Support for DNG usually arrives later, but you may not want to wait for that.
For more background on file types, see these related tutorials: Raw vs JPEG and Image Formats.
5. Set the destination
On the right panel, open Destination. Choose the parent folder where you want the images stored, then decide whether to organize them by date or into a single folder you created earlier.
6. Destination: By Date
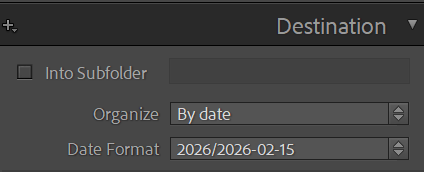
When you select your destination folder, the default setting in the Destination panel is Organize: By Date.
If your photos are taken on different days, they will be organized into different folders, for each day. See the next step for an example.
7. By Date Creates Subfolders
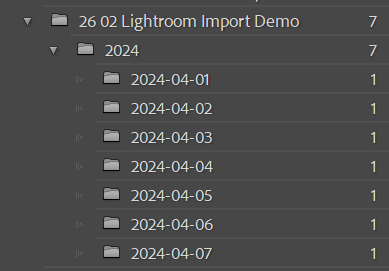
On a 7 day trip, I took photos on each day. This example includes just one photo per day.
Personally, I prefer all photos from one shoot, to be in a single folder.
8. By Date Folders
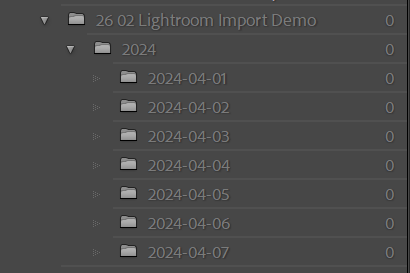
Even if you delete all the photos from Lightroom, the folders remain. Of course you can then delete them in a separate step or two (right click on the folder and select Delete), but I prefer to work more efficiently.
9. Destination: 3 options
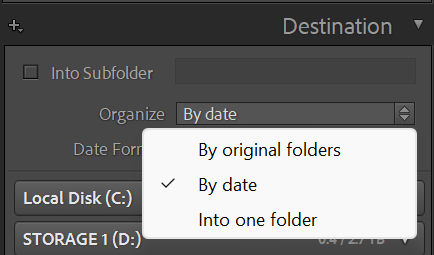
Click on the arrows on the right of the Organize drop-down to see three options;
- By original folders
- By date
- Into one folder
We've looked at By Date. Next we'll look at By original folders.
10. Destination: By original folders
Select By original folders.
This creates a subfolder with the name of the original folder.
11. Original Subfolder

The folder and subfolder are highlighted in red.
The subfolder is the original folder name.
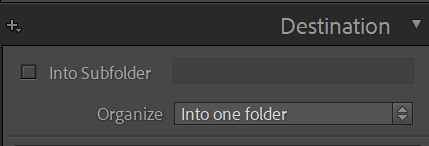
12. Destination: Into one folder
This time, select Into one folder.
It does what it says on the tin and puts your imported folders into only one folder. No subfolder, or multiple subfolder nonsense.
13. Only one folder created

It does what it says on the tin and puts your imported folders into only one folder. No subfolder, or multiple subfolder nonsense.
14. Start the import
When you’re happy with the source, handling method, destination, and options, click Import (Classic) or Add Photos (cloud). Lightroom will copy/move/add the files, build previews, and apply any presets, metadata, and keywords.
Other tutorials will look at creating and applying presets,
15. Go to Folder
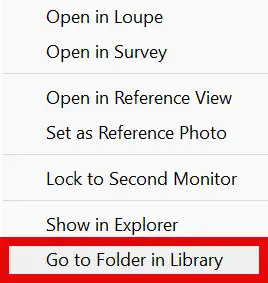
To view the actual folder you have just imported your photos into, right-click on any of the photos and select Go to Folder in Library.
16. View Photos

You will see all the photos you just imported. From here you can develop, or export the photos.
Summary
Importing photos is quite straightforward, but the Destination options can cause confusion, especially the default By Date option, which creates a subfolder for each day photos are taken on. If you are importing photos from multiple days, such as a holiday, or multi day shoot, this option will create a number of unnecessary subfolders.
