Brush Tool
The Brush Tool is one of several painting tools in Photoshop. However, it is not just for painting. For example, it's also used in editing Layer Masks.
There are also many brush-based tools, including Clone Stamp, Pencil, Eraser, Spot Healing Brush, Mixer Brush, and more. Of course these don't all work exactly like the Brush tool, but some things, such as brush size and hardness apply to all of them.
Brushes are too large a subject for this page, but this page will deal with Brush basics, which apply to many brush-based tools.

Brush Tool Options
Detailed descriptions of each tool option
Tool Presets

You can create and save a Tool Preset for any tool. This will remember settings that you choose. Presets for brushes are much more useful than for some tools. If you wish to use presets, you have the option of either creating a tool preset or a brush preset. Right click on the Tool Presets button to reset the tool to default settings.
Brush Presets
Brush Presets is similar to the following 2 panels; Brush Settings and Brushes.

Here you can change size and hardness and select from a range of brush presets. There are many brushes available and you can also create your own.
Note that this panel is very similar to the following 2 panels.
There is quite a bit of duplication in these Panels. Many things you can do in either, although the Brush Settings Panel has more options.
Brushes Panel
The Panel contains 2 tabs; Brush Settings and Brushes.
This is the Brush Settings Tab.

This panel allows you to customize any brush with a wide range of options and settings, which will change the characteristics of the brush. You can then save these brushes.
Brush Settings Panel

You can access a vast number of brushes, search for particular brushes and more.
Brushes are a very large subject, too large to fully go into here, but I will write more on them in the future.
As mentioned in the previous option, there is some duplication with this panel and Brush Presets and Settings.
Mode

Choose to paint with a range of Blend Modes, for different effects.
Opacity

Change the Brush Opacity that you paint with. The next option allows you to override this if you have a pressure sensitive pen and tablet.
In one brush stroke, no matter how many times you go over the same area, the ink applied will be limited by the Opacity. If you end the brush stroke and begin a new stroke, it will apply more ink.
Opacity is often confused with Flow, (see below). Flow allows you to build up the ink applied in the same stroke, by going over and over an area.
Pressure Sensitive Opacity

If you have a pressure sensitive pen and tablet, if you turn this on, the opacity will be controlled by the pen and tablet. If the setting is off, opacity will be controlled by the Brush Opacity setting (the previous option).
Flow

Flow allows you to build up the ink applied in the same stroke, by going over and over an area.
This similar, but different to Opacity. In one brush stroke, no matter how many times you go over the same area, the ink applied will be limited by the Opacity. If you end the brush stroke and begin a new stroke, it will apply more ink.
Airbrush Effect

Build up paint in the same way as a real world airbrush.
Smoothing

As you paint with freehand brush strokes, choose how much Photoshop will automatically smooth out those strokes, so they are not jerky.
There are also several options.
One thing to note is that the default setting is 10%. The lower the percentage, the more responsive the brush stroke. This will also depend on your computer, processor, memory and graphics card. As you increase smoothing, you may notice some lag.
Brush Angle

If you have a non round brush, you can change the angle of the brush.
It won't make any difference on a round brush.
Pressure Sensitive Size

If you have a pressure sensitive pen and tablet, you can turn on this option, so brush size is controlled by the pen pressure. If this is off, size will be controlled by brush settings.
For non pressure sensitive users, the best way to change brush size is with the square brackets keys [ ].
Symmetry Options

Paint symmetrical patterns and shapes with this option turned on.
There are a number of symmetry options available.
How to use the Brush Tool
There are a number of different uses for the Brush tool. It can be used for digital painting, creating patterns and artwork and is also used a lot in editing or refining Layer Masks.
As mentioned above, Brushes are a large subject and there are different uses. This guide will be on basic use of the brush.
Other subjects that are connected to Brush include; Foreground & Background Colors, Swatches and Layer Masks and these will be covered soon.
Step 1

Select the Brush Tool from the toolbar. Like most tools, it shares the button with other tools and the one that is visible will be the last tool used.
Step 2

Select a brush. There is a large selection and there are options for how to select it. You can either click on the 2nd or 3rd button on the Options bar, Brush Presets, or Brush Settings Panel, as detailed above. Step 4 shows both panels. They look almost identical.
Step 3

Whichever you open, if your screen size allows, I would suggest enlarging either panel.
Move the cursor over the bottom right corner of the panel and watch for it to change into a two-way arrow, indicating you can resize.
Click and drag to enlarge the panel. The next step shows enlarged panels for both options.
Step 4


The panels are virtually identical.
I've highlighted in red the different categories. You can expand and collapse each category by clicking on the drop down arrow.
Click on a brush to select it, then begin painting.
Brush Display Options - 1

You have choices about how you wish to show the brushes.
On the Options Bar, click the Brush Settings Panel.
That will open the panel, as shown in the next step.
Step 1

Click on the menu button (highlighted in green), to open up the panel of brush options shown in the next step.
Step 1

Here are the first 4 brushes in the brushes panel. To keep things simple, I will reference these 4 brushes over the following examples.
The options highlighted in green, show that you can choose whether or not to display the brush name, brush stroke, or brush tip.
Th
Display Options - 1
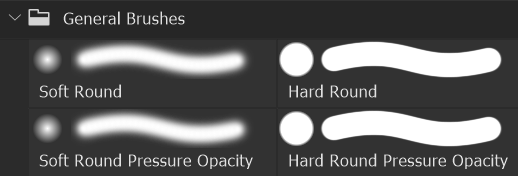
Here are the first 4 brushes in the brushes panel, which I will use to show the different options.
This view shows the brush name, stroke and tip are all showing.
Display Options - 2
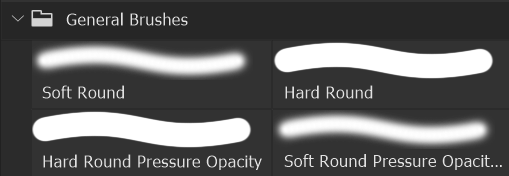
Only the brush stroke and name are showing.
Display Options - 3

Only the brush name is showing.
Display Options - 4

Only the brush tip and name are showing.
Display Options - 5

Only the brush tip is showing.
Brush Stroke Examples - 1
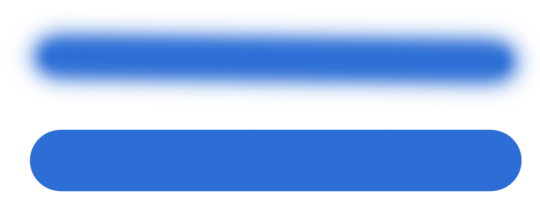
These are the first two brushes. The top one is the default soft brush. The bottom one is the default hard brush.
To paint a perfectly straight line, click once at the beginning, then press and hold Shift while you click again. A perfectly straight line will be painted between these two points. This works with all brush-based tools.
Brush Stroke Examples - 1

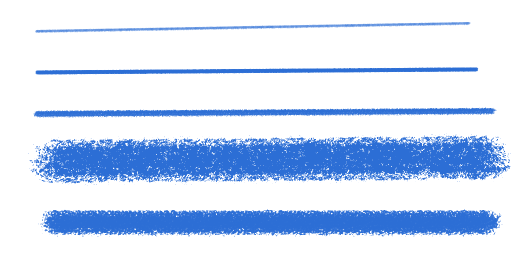
These are the first 5 Dry Media Brushes and an example of each brush stroke. They are all at the default settings. Brush size was not changed from default, but of course you can resize any brush with the square bracket keys [ ]. Or from brush settings.
Brush Stroke Examples - 1
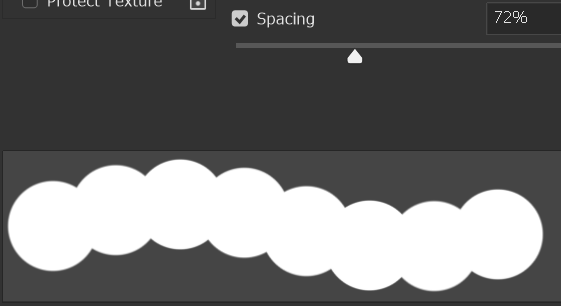

When you click and drag a brush to create stroke, multiple brush strokes are applied. Adjust Spacing to create greater space between them. However, unless you want to do this for a particular effect, I suggest you leave them at the default settings.
Brush Shape & Angle - 1
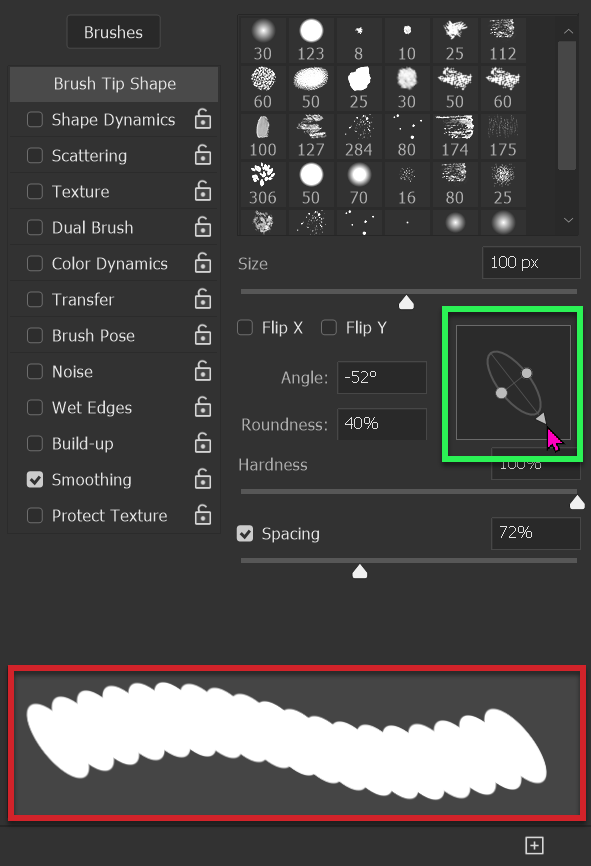
You can change the shape and angle of a brush.
I have changed the shape of this brush from round to a thinner shape and rotated it -52 degrees.
See the preview of the brush stroke in the preview at the bottom of the panel (highlighted in red).
See the next steps for how to do this.
Brush Shape & Angle - 1


To change the shape, or thickness of a brush, click and drag either of the two circles.
To change the angle, click and drag the triangle, or you can enter a number in the Angle box.
Brush Shape & Angle - 1

This is the result of the changes to shape and angle, from the last two steps.
The top stroke is the narrower brush with no change to angle.
The bottom stroke is the same narrower brush, but with the angle change. Note that spacing is set higher than normal, just to illustrate the brush stroke.
Brush Stroke Examples - 1

These are the first two brushes. The top one is the default soft brush. The bottom one is the default hard brush.
To paint a perfectly straight line, click once at the beginning, then press and hold Shift while you click again. A perfectly straight line will be painted between these two points. This works with all brush-based tools.
Summary of the Brush Tool
The Brush tool itself is used in several different scenarios, but what you learn about the Brush tool will also stand you in good stead when using other "brush-based" tools.


